
How to Choose RC Car Body: Fit, Material & Painting Tips
Learn how to choose an RC car body by measuring fit, selecting materials, and planning paint for the best custom look and performance.
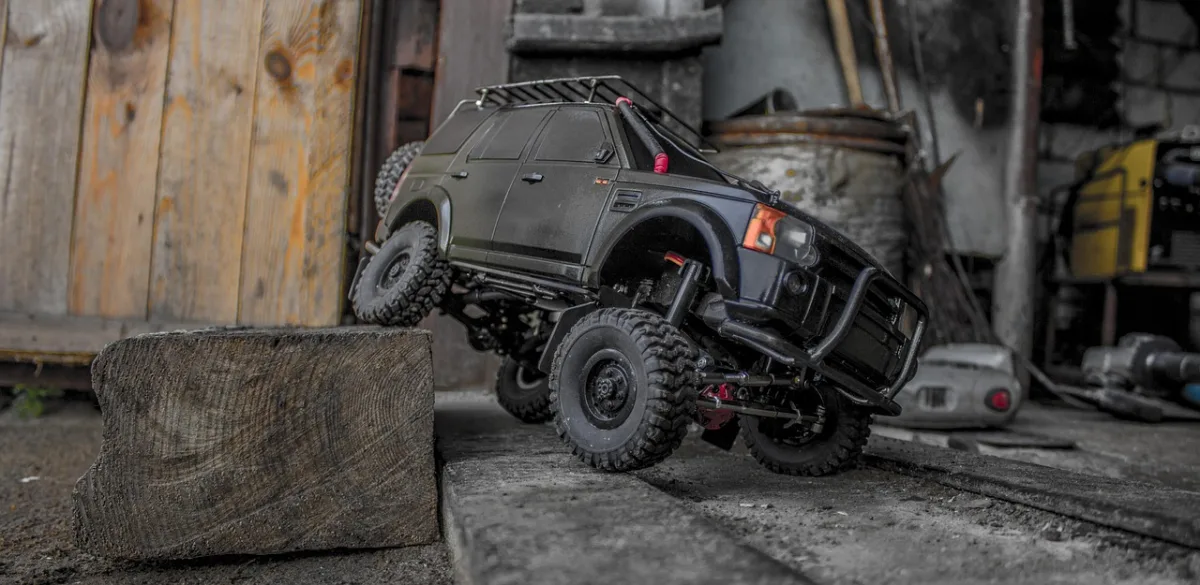
Photo: alekseiap199232 via Pixabay
Measure the chassis
A clear shell on the bench can look right until the front tires hit the arches or the rear body posts land in the wrong place. Put the chassis on a flat surface and measure before browsing styles.
Start with wheelbase, the center-to-center distance between front and rear axle lines. Then measure track width across the outside of the wheels, the body-post spacing, post height, and where the tires sit relative to the chassis.
A 1/10 label is only a starting point. Depending on vehicle type, 1/10 RC cars can run from about 17.5 to 24.9 inches long, so a fixed “1/10 body size” is not a reliable buying guide.[5]
Use the manufacturer’s specifications for your exact chassis and compare them with the body listing. A shell that matches your car’s intended class, wheelbase, and mounting layout saves you from cutting oversized arches or drilling a row of bad holes.[5]
Match the body style to the vehicle class
The wheel arches tell you whether a body belongs on your chassis. A touring-car shell, drift shell, buggy body, short-course truck body, crawler body, and no-prep drag body all place their arches, bumpers, and side contours differently.
For a scale truck or crawler, choose a shell shaped around the truck’s wheel placement and chassis width. RC truck bodies are sold specifically for scale truck and rock-crawling applications, where the visual target is a recognizable road or trail vehicle.[12]
For a 1/10 no-prep drag car, use a body sold for that class, not a generic touring shell with a similar roofline. Custom-painted 1/10 drag bodies are offered as a distinct category because the fit and visual style are class-specific.[10]
We would skip forcing a favorite full-size-car shape onto an unrelated chassis. A body with arches centered over the tires looks intentional, while one with tires rubbing a fender edge looks wrong before the first coat of paint.
Choose the shell material
Polycarbonate, often called Lexan, is the default material for a custom RC body. It is light, flexible, impact-resistant, and easy to paint from the inside, which makes it the best match for most hobbyists chasing a new look.[7]
That flexibility helps when the shell takes a rollover or catches a body post. A painted polycarbonate shell can flex with the impact, while the color remains protected behind the clear plastic rather than exposed on the outer surface.[15]
Fiberglass and carbon fiber offer strength advantages, but they are less flexible and less common for ordinary body projects. Carbon fiber also costs more and offers fewer straightforward paint and appearance options than a clear polycarbonate shell.[7]
We would choose polycarbonate for nearly every appearance build, especially for a first painted body. It gives you the widest color and decal options without making a cosmetic project expensive before the paint even comes out.
Set the body budget before selecting graphics
The price range is wide because body cost follows scale, material, design complexity, and brand reputation. Basic polycarbonate bodies can cost less than $30, while custom-painted or licensed choices can pass $100 and extend beyond $150.[8][10]
A low-price clear shell buys you the body itself, then leaves paint, masking materials, decals, and detailing to your budget. A custom-painted body includes paintwork in the purchase, but check the listing for whether decals and other finishing details are included.[10]
Licensed designs command more because the body is built around a recognizable vehicle look. That can be the right purchase when the exact car matters to you, but it is not the only route to a convincing custom finish.[10]
Put the money into the shell shape first, then the paint plan. We would take a correctly fitted, basic clear polycarbonate body and finish it carefully before spending extra on an exotic material or a design that does not suit the chassis.
Plan the color layout on the outside first
Leave the protective film on the outside of a clear shell while you design. It protects the exterior while you handle the body, cut it, mark body-post holes, and mask the inside for paint.[15]
Draw your color breaks around body lines that already exist: beltlines, hood vents, roof edges, fender creases, and window borders. Those molded features give stripes and panels a deliberate edge instead of leaving them floating across a large flat side.
Because polycarbonate bodies are painted from the inside, the order of colors matters. Paint the details and darker colors first, then add the backing color behind them so the finished design reads correctly through the clear plastic.[15]
Keep your first scheme manageable. Two colors, window masks, and a decal package can look sharper than five colors separated by rushed tape lines, especially on a body with compound curves around the front fenders and rear quarters.
Prepare the inside surface
Wash the inside of the clear shell before paint goes near it. Oils from handling, mold-release residue, dust, and fingerprints can interfere with adhesion and turn a clean paint job into peeling patches or beading paint.[17][19]
Use a thorough cleaning process and let the shell dry completely before masking. Preparation is where a body gains its durable finish, because paint cannot bond properly to contamination hidden beneath the first coat.[17]
Do not substitute whatever spray paint is already in the garage. Paint not intended for polycarbonate can peel because the shell flexes, while polycarbonate-specific paint is designed for the body material and the inside-painting process.[20]
Tamiya’s PS series is one example of paint made for polycarbonate bodies. Use a paint system intended for RC polycarbonate, then follow its instructions on coats and drying instead of mixing incompatible materials.[15]
Mask the design cleanly
Apply masking carefully along the lines you planned, pressing the tape down around curves, wheel arches, vents, and sharp molded edges. Poor masking is a direct route to paint bleed under the tape and a rough-looking color break.[20]
Cut masks with a sharp blade and avoid dragging the point deeply into the polycarbonate. Your goal is to separate paint sections, not score a crack starter into a flexible shell.
Spray several thin coats instead of trying to cover the shell in one heavy pass. Thin coats give you more control around complex masked areas and reduce the chance of an uneven finish.[15]
Back colors as the design requires, then remove masking only after the paint has had time to set. If a line needs correction, fix it before moving to decals, because stickers rarely hide a fuzzy painted edge.
Paint in stable conditions
Humidity and temperature affect the way paint dries and holds up. High humidity can contribute to cloudiness and blistering, while very low humidity can promote cracking; extreme temperatures can cause bubbling or slow drying.[18]
Paint in moderate conditions and keep the workspace clean. Dust stuck in a glossy roof or hood becomes part of the appearance, and it will be visible every time the car is sitting on the driver stand.
Allow each coat to dry as directed before adding the next color or backing layer. Rushing the schedule can trap problems under later coats, where they are far harder to correct without starting again.[15]
A clear coating can add protection to the finished paint system when used appropriately. Pair it with proper cleaning and controlled conditions, since clear coat cannot rescue paint that was applied over contamination or wet masking edges.[17][18]
Apply decals and scale details
Decals add the finishing layer after paint, whether you want racing numbers, sponsor-style markings, grille details, headlights, window trim, or a full scale livery. Their placement can make a simple body look tied together.[22]
Fit each decal slowly, beginning at one edge and smoothing toward the other. Work around compound curves with care, because a crooked door graphic or wrinkled headlight decal draws attention faster than a plain panel does.
Use window masks and window decals to define the greenhouse cleanly. On a body painted from the inside, the window area remains clear unless you add tinting, masks, or decals as part of the planned look.[15][22]
Lights and detailing are visual upgrades, not a reason to ignore fit. We would finish the main paint and decal layout first, then add smaller details only where they support the body’s style instead of crowding it.
Drill and mount the shell without cracking it
Set the finished body over the chassis and confirm wheel position before drilling the body-post holes. Mark the locations from the chassis, check them again, then make the smallest clean holes needed for the posts.
Mounting hardware can damage a body when overtightened. Tight body clips, hardware, or reinforcements can concentrate force around the holes, so avoid clamping the shell so hard that the polycarbonate is stressed or distorted.[21]
Reinforcement around mounting points can improve durability where repeated removal and rollover impacts work on the shell. It is a targeted upgrade, because body-post holes are common stress points on a painted polycarbonate body.[21]
Stand back once the shell is mounted and check the basics: centered wheel arches, level roofline, clean window line, and no tire contact. A body that fits squarely lets the paintwork do its job.
Frequently Asked Questions
How do I measure my RC car to choose the right body?
Start by measuring your chassis wheelbase, which is the center-to-center distance between the front and rear axle lines. Also measure the track width across the outside of the wheels, body-post spacing and height, and where the tires sit relative to the chassis. Use your manufacturer’s exact chassis specifications and compare them with the body listing to ensure a proper fit, since scale labels alone do not guarantee compatibility.
What materials are best for RC car bodies?
Polycarbonate, often called Lexan, is the preferred material for most custom RC car bodies because it is lightweight, flexible, impact-resistant, and easy to paint from the inside. While fiberglass and carbon fiber offer greater strength, they are less flexible, less common, and more expensive, making polycarbonate the best choice for most hobbyists.
How do I match an RC car body to my chassis?
Choose a body style designed for your vehicle class, paying close attention to wheel arch placement, bumpers, and side contours. For example, use a touring-car shell for touring chassis or a scale truck body for rock crawlers. A body with arches centered over the tires looks intentional and fits well, while one with tires rubbing fenders will not fit properly.
What is the cost range for RC car bodies?
Basic polycarbonate bodies typically cost under $30, while custom-painted or licensed bodies can exceed $100 and sometimes go beyond $150. Prices vary widely depending on scale, material, design complexity, and brand reputation. Budget first for a correctly fitting shell before considering more expensive materials or elaborate paint jobs.
How should I prepare and paint an RC car body?
Buy an unpainted clear polycarbonate shell and paint on the inside surface using polycarbonate-specific paints. Proper preparation includes thorough cleaning, masking, and reinforcing mounting points. Apply multiple thin coats in moderate environmental conditions to avoid issues like cloudiness or cracking, and finish with clear coating for durability.
How we researched this
This article was assembled from 23 cited references.
Nothing here is based on hands-on testing. Where a figure or finding appears, it belongs to the source cited beside it, and the writing says so rather than implying otherwise. Every source is listed below so you can check it.
Sources
- RC Car Scale Sizes Explained (With Chart) | Shock & Servo
- RC Car Sizes Explained: Guide to 1/8, 1/10, 1/16, 1/18, 1/24 Scales | VRX Racing
- RC Car Scale Size Chart: 1/8, 1/10, 1/16, 1/18 And 1/24 Compared
- How Big Is a 1/8 Scale RC Car? Real Dimensions, Weight & Size Comparisons - RC Facts
- RC Car Scale Sizes Explained: Real Lengths by Scale | RC Cars Guide
- Rc Car Body Factory, Custom Rc Car Body OEM/ODM Manufacturing Company
- What Are RC Car Bodies Made Of: A Comprehensive Guide
- Great Bodies for your RC Car, ViciousRC
- RC Car Bodies | RC Visions
- Custom Painted RC Car Bodies 1:10 No Prep Drag | Rc Tradingpost
- RC Cars & Trucks Bodies | Horizon Hobby
- RC Truck Bodies | Rock Crawling Body| Scale Truck Bodies
- R/C Car Bodies - Hub Hobby
- How to Paint Carbon Fiber on an RC Car Body, RaceNRCs
- How To Paint RC Car Body - Complete Walkthrough - RC Crush
- BODY MAKING GUIDE | PANDORA RC - Drift RC Car bodies & Parts
- Master Rc Body Painting: Essential Prep Steps For A Flawless Finish | CyPaint
- How Weather Impacts Car Paint | Protect Your Vehicle’s Finish
- How to paint an RC hard body: fixing paint that beads up, RC Car Action
- RC Body Paint: The Complete Guide to Finishing Your RC Car
- RC Car Body Mounting Hardware Reinforcement Kit: Ultimate 2026 Guide for Durability and Performance - HobbyGradeRC.com
- RC Body Decals, Lights and Detailing Guide | RCUK
- 7 Mistakes You’re Making with Your Radio Controlled Cars (and How to Fix Them)
Related Articles
How to Choose RC Car Tires for Different Surfaces
Learn how to choose RC car tires by surface, tread, compound, and size for optimal grip and performance on asphalt, dirt, gravel, and grass.
Choose RC Car Battery Charger
Learn how to choose an RC car battery charger by matching chemistry, cell count, charge rate, and wattage for safe and efficient charging.
How to Choose RC Car Tires for Different Surfaces
Learn how to choose RC car tires for asphalt, dirt, grass, and more to maximize traction and handling on every surface.

How to Choose RC Car Tires for Racing
Learn how to choose RC car tires for racing by matching compound, tread, and size to your track surface and conditions for optimal grip and performance.