
How to Clean RC Car Parts: Safe and Effective Methods
Learn how to clean RC car parts safely with tips on brushes, cleaners, and electronics care to keep your car running smoothly.
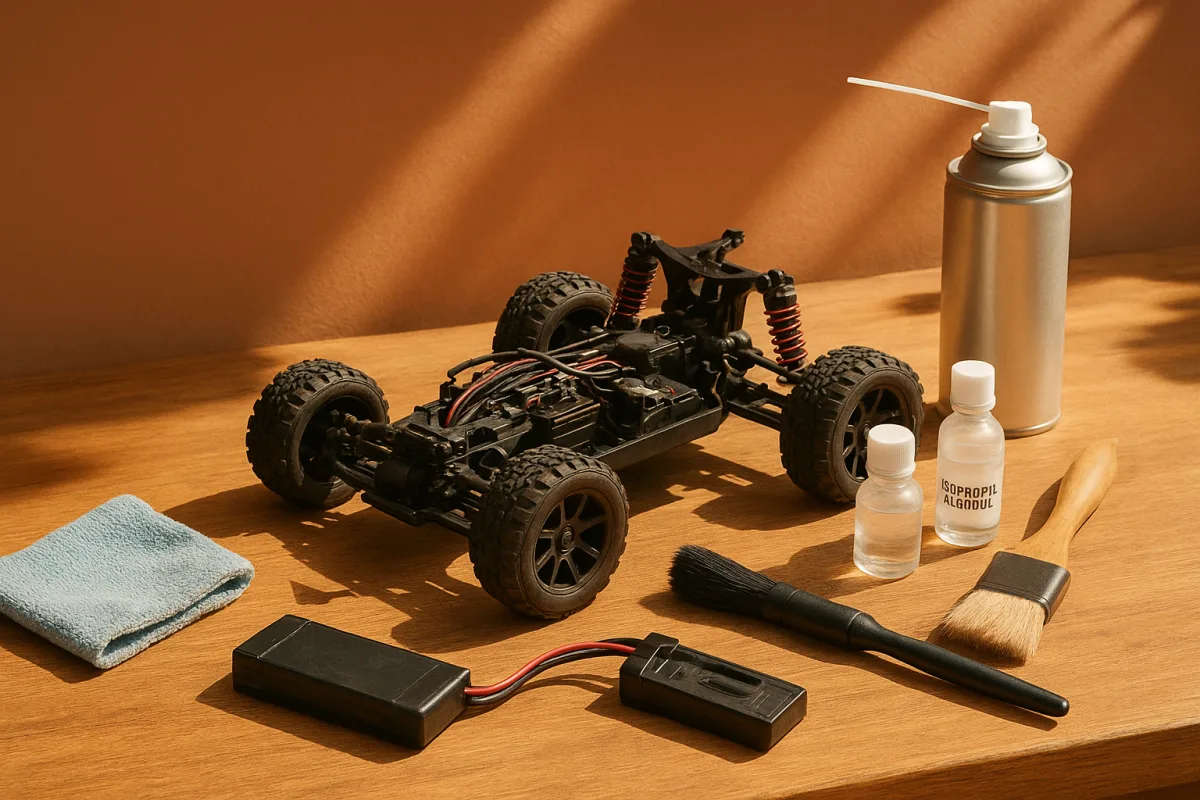
Start at the bench, before the dirt reaches the electronics
The first job is not spraying cleaner. Switch the car off, unplug and remove the battery, then set it somewhere safe while you work. RC Tech Tips and Horizon Hobby both flag cleaning with a battery installed as a common mistake. [2][12]
That applies whether you are cleaning a 1/10 touring car after carpet practice or a 1/8 buggy after a wet outdoor qualifier. The battery chemistry changes, but the rule does not: a plugged-in pack and cleaning fluid do not belong together.
Do not treat battery cleaning as part of the normal chassis wash. The available maintenance guidance covers removing the pack before cleaning, but does not provide a proper protocol for cleaning LiPos, NiMH packs, or battery compartments. [2][15]
Before taking wheels off, look at the car as it came off track. Note where mud packed into the rear arms, whether grass wound around the outdrives, and whether the pinion area is dusty. Cleaning is also your best inspection interval.
A 1/10 2WD buggy often collects dirt around the rear gearbox, slipper area and exposed steering links. A 1/8 truggy can carry much more wet soil inside its chassis braces and suspension pockets, so it needs more patient brush work.
Remove the body shell, wheels and any large clumps by hand. Keeping the shell separate prevents you from dragging abrasive grit across painted surfaces while you work on the chassis. It also gives you access to the suspension and drivetrain.
Deal with loose dust before adding any cleaner
Use a soft detailing brush to break dirt loose from the chassis, suspension arms, turnbuckles, shock bodies and gearbox exterior. Then use compressed air to move the loosened dust away, as recommended by TopRC and RC Diffusion. [3]
Keep the air stream controlled rather than blasting everything indiscriminately. You are trying to lift dirt out of corners, not drive grit farther into bearings, receiver boxes, motor vents or around the spur gear.
A dry indoor 1/10 electric touring car may only need this first-stage clean after a normal meeting. EuroRC suggests cleaning electric cars every two or three dry runs, but that is not a schedule for a dusty clay track. [8]
For a dirt 1/10 stadium truck, 1/8 buggy or monster truck, cleaning starts when the car gets back to the pit. Speed World Raceway notes that dust, humidity and temperature affect maintenance needs, while muddy or wet conditions demand more frequent attention. [14]
Use a microfiber cloth after brushing to wipe flat surfaces, shock shafts and accessible plastic parts. Cleveland Models recommends microfiber because it cleans without the scratching risk of rough shop rags or aggressive scrubbers. [17]
Do not reach for a stiff toothbrush, wire brush or scouring pad on a polycarbonate body, anodized shock cap or plastic arm. None of the supplied guidance supports harsh scrubbers, and abrasive cleaning is a poor trade for a car that merely looks cleaner.
When mud is stuck on, clean only the parts that can handle moisture
Dried mud needs more than air, but this is where racers create trouble. Water and electronics do not mix, and RC maintenance sources consistently caution against getting water on non-waterproof electronic components. [3][13]
For the chassis, apply a mild cleaner to a cloth or brush rather than flooding the car. RC Tech Tips identifies diluted mild detergents such as Simple Green for general cleaning, while RC Visions lists ammonia-free glass cleaner as another plastics-safe option when used appropriately. [2][10]
Follow the cleaner manufacturer’s directions because the research does not establish a universal dilution ratio. Stronger is not better around plastics, decals, paint, rubber seals, bearings or anodized finishes.
Work one dirty area at a time. Brush cleaner onto muddy suspension arms, skid plates, wheel centers and the underside of the chassis, then wipe the loosened grime away with microfiber. Avoid soaking bearings, hinge-pin blocks and exposed gear mesh.
The removable body shell is the main exception to the no-water habit. RC Team recommends warm water and mild soap for removable bodies, but RaceNRCs cautions against water use on non-waterproof cars. The sensible line is simple: wash only detached, non-electronic pieces. [5][13]
If you rinse a shell, dry both sides thoroughly before it goes back on the car. Water trapped around body-post holes, decals or wheel arches will not improve the finish, and it can drip onto the chassis during reassembly.
Never use high-pressure water. RC Modellbau warns that harsh chemicals and high-pressure water can damage bearings, electronics and paint. A pressure washer may be quick on a full-size truck, but it is the wrong tool for a diff case full of tiny seals. [15]
Clean contacts and the motor with the right solvent
Electrical connections deserve targeted cleaning, especially after wet running or repeated dusty track days. Use 90 percent or higher isopropyl alcohol on battery connectors, bullet connectors and accessible electrical contacts, as RC Models Hub recommends. [1]
For the least residue on sensitive electronics, high-purity IPA is preferable. A1-ESD identifies 99.9 percent isopropanol as suitable for plastics, metals and electronics, which makes it the safer choice when you are cleaning plugs and contact surfaces. [9]
Put IPA on a lint-free swab or cloth rather than pouring it into the receiver box or ESC fan. The research supports contact cleaning, but does not provide a detailed cleaning procedure for ESC internals or receivers. Keep the solvent targeted.
If you run a brushed motor, IPA can be used on the commutator. RC Car Action advises caution with motor disassembly, and the research does not support a detailed internal-motor cleaning recipe. Do not turn a simple clean into a damaged armature. [6]
For sensorless brushless motors, keep the focus on the exterior and ventilation openings. Brush dust away carefully and avoid filling the motor with liquid. If the motor needs internal attention, cautious disassembly is the limit of the supplied guidance. [6]
This is also not the moment to spray random degreaser into your 1/10 buggy transmission or 1/8 truggy center diff. You will strip lubrication from places that need it, then wonder why the drivetrain feels rough at the next meeting.
Dry it properly, then restore lubrication
Once the dirt and cleaner are gone, drying is a maintenance step, not an optional cosmetic one. Use compressed air to chase moisture out of suspension pockets and crevices, then wipe accessible surfaces with microfiber. [13][16]
Let the car sit in a warm, dry place before reinstalling the battery or body. RC Car Avignon and RaceNRCs support air drying and cloth drying, with general guidance of roughly 30 to 60 minutes, although actual time depends on humidity and how wet the car became. [13][16]
Do not store the chassis with moisture trapped under the receiver box cover, inside wheel hexes or around metal hardware. Horizon Hobby, RC Tech Tips and RaceNRCs all identify stored moisture and neglected post-run cleaning as common maintenance mistakes. [2][12][13]
Once dry, lubricate the moving parts you cleaned. RC Tech Tips and RaceNRCs recommend appropriate RC lubricants or white lithium grease for moving components after cleaning. Apply lightly, because excess lubricant turns dusty track grit into grinding paste. [2][13]
WD-40 appears in some RC cleaning guidance as a degreaser or water-displacing spray. That does not make it a durable bearing, hinge-pin or drivetrain lubricant. Use it only with that limitation in mind, then use a purpose-made lubricant where lubrication is actually required. [2]
Do not spray lubricant across the entire chassis. Keep it off brake surfaces where applicable, tire tread, spur and pinion teeth, electrical plugs, and any area where dust will immediately stick. A clean, dry chassis is usually faster than an oily one.
Reassemble with an inspection mindset
Put the wheels and body back on only after checking the places dirt hides. Spin each wheel, feel for roughness, check that steering moves freely, and look for grass or thread wrapped around axles and outdrives.
This is where cleaning helps keep handling consistent. A 1/10 buggy with a binding rear arm does not need a new carbon shock tower. A 1/8 truggy with gritty bearings will not be fixed by heavier diff oil or a more expensive servo.
Check shock shafts for scratches and wipe them clean before they cycle through the seals. Check the pinion and spur area for grit, then confirm the gear mesh has not changed. Dirt in the mesh is a wear problem, not a tuning adjustment.
Look over screws, body mounts, suspension pins and turnbuckles while the chassis is clean enough to see them. Escape RC includes regular checks of parts and fasteners in basic maintenance, which is far easier after mud is removed. [4]
Reconnect the battery only when the chassis is dry and reassembled. Inspect connectors first, especially if you run high-current 4S packs in a 1/8 class. Cleaning does not change a LiPo’s C-rating, but clean, dry contacts help avoid unnecessary resistance.
Match the cleaning routine to where and how you run
There is no honest universal interval. TopRC and TRVBABY support cleaning after every dirty or wet run, while EuroRC suggests a less frequent routine for dry electric cars. The right schedule follows conditions, not a calendar. [3][7][8]
After wet grass, puddles, sand or mud, do the full routine immediately: remove battery, brush, air-clean, use mild cleaner only where needed, dry thoroughly and relubricate moving parts. Leaving mud until next week invites corrosion and seized hardware.
After a clean carpet session with a 1/10 electric touring car, brush off tire debris and dust, inspect the drivetrain, and save the detergent for when grime actually accumulates. Over-cleaning with chemicals is no better than ignoring dirt.
For outdoor clay, loose dirt and humid conditions, plan on more frequent cleaning and lubrication. RC Cars Guide and Speed World Raceway both tie environmental conditions to cleaning frequency and maintenance requirements. [14][15]
The goal is not a showroom chassis every time. It is a car that is dry, free of abrasive dirt, properly lubricated where it needs to be, and easy to inspect before the next run. That routine preserves parts better than most bolt-on upgrades.
Frequently Asked Questions
How do I safely clean the electronic parts of my RC car?
Always remove the battery pack before cleaning to avoid electronics damage. Use 90% or higher isopropyl alcohol to clean electrical contacts and motor commutators, as it leaves less residue than household cleaners. Avoid using water or harsh chemicals on electronic components.
What is the best method to remove mud from RC car suspension?
Start by removing large clumps of mud by hand, then use a soft detailing brush to loosen dirt around suspension arms and pivot points. Follow with controlled bursts of compressed air to blow away loosened debris without forcing grit deeper into bearings or electronics.
Can I use water to clean my RC car parts?
Water should only be used on removable, non-electronic parts such as the body shell, and only if you can dry them thoroughly afterward. Avoid using water on electronics or non-removable parts to prevent damage.
How often should I clean my RC car after running in dirt or mud?
Clean your RC car after every wet, muddy, or dusty run to prevent buildup that can affect performance. For electric on-road cars running on cleaner surfaces, a lighter clean every two or three runs may suffice, but adjust frequency based on conditions.
What cleaning products are safe for RC car plastics and electronics?
Use mild detergents like Simple Green or ammonia-free glass cleaner diluted appropriately for plastics. For electronics, use high-purity isopropyl alcohol (90% or higher). Avoid household degreasers, harsh chemicals, and abrasive scrubbers to protect sensitive parts.
How we researched this
This article was assembled from 17 cited references.
Nothing here is based on hands-on testing. Where a figure or finding appears, it belongs to the source cited beside it, and the writing says so rather than implying otherwise. Every source is listed below so you can check it.
Sources
- RC Car Maintenance and Cleaning: A Beginner's Guide – RC Models Hub
- How to Clean Your RC Car: Complete Maintenance Guide - RC Tech Tips
- How do I maintain an RC car?
- Car's Basic Maintenance – Escape RC
- Make your RC car shine and boost its performance
- KEEP IT CLEAN - Brushless Motor Maintenance Basics - RC Car Action
- Redcat RC Car Maintenance Basics Every Owner Should Know - TRVBABY
- How To Clean Your RC Car: Complete Guide with Pro Tips | EuroRC.com
- Isopropanol PCB Cleaning Guide | A1-ESD
- Best cleaner for rc cars | Top cleaning products and tips
- How to Select the Best Ultrasonic Cleaning Solution
- Radio Control Best Practices and RC Myths Busted
- How To Clean Your RC Car After Mud, Dust, Or Water – RaceNRCs
- How to Maintain Your RC Car After Every Run | Speed World Raceway
- RC Car Maintenance Guide: Routines That Actually Keep Your RC Running (2026) | RC Cars Guide
- Comment nettoyer sa RC CAR | Guide RC Car Avignon
- How to Clean Your RC Car: Complete Maintenance Guide
Related Articles
RC Car Tire Maintenance: How to Clean and Extend Tire Life
Learn effective RC car tire maintenance tips to clean, dry, and care for your tires to extend their lifespan and improve performance.
Best RC Car for Off Road: ARRMA Granite vs Traxxas Slash
Compare the best RC car for off road use: ARRMA Granite vs Traxxas Slash. Get expert advice on terrain fit, battery, and maintenance.
How to Charge RC Car Batteries Safely and Effectively
Learn how to charge RC car batteries safely with correct settings, balance charging, and tips for NiMH and LiPo packs.
How to Store RC Car for Winter: Essential Preparation Tips
Learn how to store your RC car for winter safely with tips on cleaning, battery care, and maintenance to protect your car during off-season.